How to Make Your Own Six-Pointed Paper Snowflakes
Step 1.
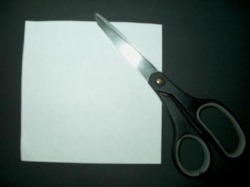
First, begin with a square piece of copy paper. I usually make two snowflakes for every 8.5"x11" piece of paper, so I first cut the paper in half, and then make a square from each half. This makes a snowflake about 5" across.
Step 2.
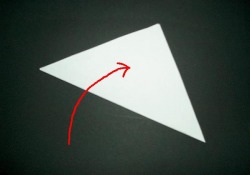
Fold the square of paper diagonally to make a triangle.
Step 3.
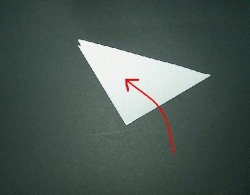
Fold this larger triangle in half to make a smaller triangle.
Step 4.
Imagine the triangle in thirds, and fold the right third over.
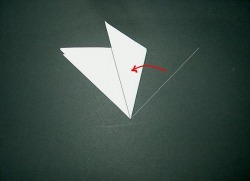
Step 5.
Fold the left third over.
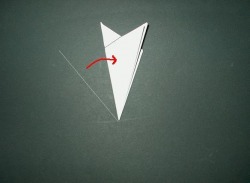
Step 6.
Cut off the top of the paper at an angle. Cutting at an angle is what makes the points of the snowflake. Eventually, you'll learn to cut at different angles to make snowflakes with points that are more or less sharp.
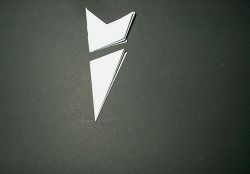
Step 7.
This is where your imagination comes in. Begin cutting away from the sides of the paper. Usually, cutting small triangles from the sides is easiest, but don't forget to try other shapes.
For this snowflake, I altered the top edge a little to make my points a different shape. I also cut out a piece with a "spiky" edge. Use your imagination!
I don't use patterns for my snowflakes: I just cut as I go. My snowflakes are never the same because I don't usually plan out my snowflakes. Sometimes I find a new cut or shape that I like, and I may use the same technique on a different snowflake, but I don't copy the whole snowflake.
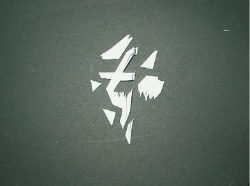
Step 8.

Unfold the paper very carefully.
The snowflake will not lay flat right away, so I like to tuck them between the pages of a book for a while before displaying them.
Tips:
- Make sure you have sharp scissors and clean hands. Dirty hands make for dingy snowflakes!
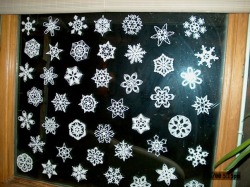
-A tiny piece of double-sided tape behind each point is a good way to stick them to a surface. I love to put mine on windows so that they're visible from inside and out. They show up beautifully at night against the dark glass.
-Avoid what I call "blank space". This is when you're cutting your snowflake in Step 7, and you leave behind big spaces of blank paper in your snowflake. Generally, anything thicker than 1/4th of an inch gets cut down into a thinner line, or by decorated it in some way (like by making tiny triangle snips all along the edge to give it "teeth"). Otherwise, when you open your snowflake, it will have thick, clunky lines instead of nice delicate ones.
-I usually make my snowflakes while sitting down on a couch or chair with a coffee table in front of me, and a small trash can between my knees. This way I can lean forward to fold the paper on the table, and then sit up and snip bits of paper into the trash can. This makes less mess.
-When folding, steps 4-5 are the hardest, when you have to try and estimate thirds. Often, you'll fold the second third over, only to discover that it doesn't line up exactly in thirds. You'll have to unfold and refold until it's as exact as you can get it. The closer to exact thirds you can get it, the more symmetrical your snowflake will be. As it is, the thickness of the paper and the amount of folding that you do will make it so that making a precisely symmetrical snowflake is almost impossible. This will be most obvious in the center of the snowflake: look at some of mine. The star in the middle of some is not perfectly symmetrical. It happens. Real snowflakes have defects too, so don't worry about it.
-Some people recommend using cuticle scissors so that you can make even more intricate snowflakes. I don't like this for two reasons. First, cuticle scissors are not comfortable in your hand. A comfortable grip is essential. Second, it is possible to get too intricate. Too many tiny snips and not enough shaping will just make your snowflakes look like lace doilies.
-Snowflake experts recommend using tracing paper and an x-acto knife to make snowflakes, to make them even more delicate and more perfectly symmetrical. However, I still like plain paper and scissors, since those are things that anyone has and you can use them with kids.